
Continue reading “DIY Facial Mask – A Yummy Way To A Healthy Skin!”


Hello,
How is your week going? Good I hope!
This is my first my product review post,yay!
I chose to review a body scrub because exfoliation is a very important part of general skincare routine for all skin types.
I used to suffer from dull unhealthy skin,until I learnt about exfoliation some years back. It amazes me,how most people still don’t know how important it is to incorporate exfoliation into their skincare routine.
Exfoliation is the removal of the dead skin cells sitting on the skin’s outermost surface.

This means that when you don’t exfoliate, all the skin treatments,lotions,serums etc that you use are just going on top of the dead cells and not penetrating into your skin. Little wonder why you feel like those products don’t work.
Here’s a practical illustration;
Bola and Bisi are friends.
Bola exfoliates regularly, Bisi doesn’t .
Bola and Bisi use the same body lotion at same time.
Bola is likely to get better results than Bisi. This because the product penetrates through Bola’s skin. While it stays on top of Bisi’s dead skin cells.
Same product, exfoliation/no-exfoliation, different results…. you get?
However you should avoid over exfoliating.
There are various ways to exfoliate the skin and the use of body scrubs is one of them.
Please note; Exfoliation is not limited to the females alone, therefore body scrubs are essential for both men and women.
So now we dive into the product review….

PRODUCT
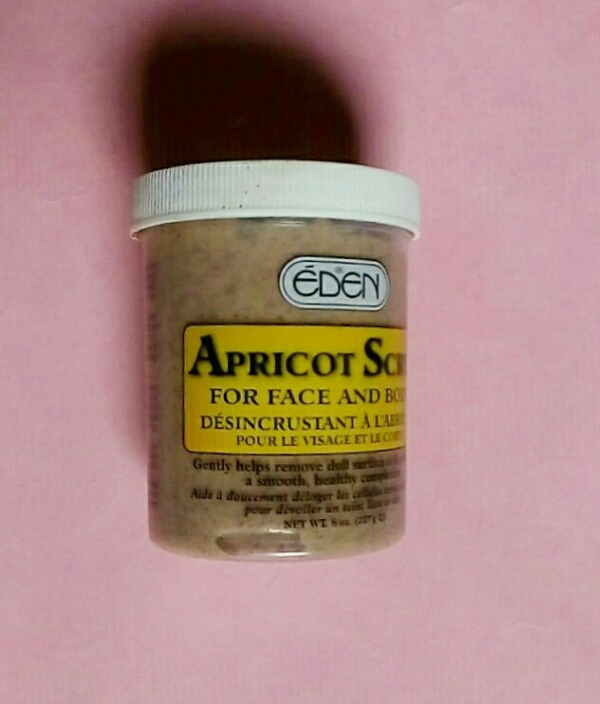
Eden Apricot Scrub For Face And Body
Product Claim;
Gently removes dull surface cells to reveal a smooth, healthy complexion.
Product Description;
A deep cleansing natural-fiber body scrub that quickly removes blackheads and impurities, unclog pores and removes dry, dead cells from the surface of your skin to reveal a smooth, fresh layer. Can be used on all skin types. Gentle enough to use daily.
Directions:
Moisten skin area on face or body with warm water. Apply with fingers and massage gently avoiding eyes and sensitive areas. Rinse well with warm water and pat dry.

MY REVIEW
This scrub comes in two cup sizes,the big one 474g, and the small one 227g/8 oz.
I got the small size which happens to be 8 oz.
How I use:
1. I rinse my face with warm(not hot) water.
2. I don’t dry my skin after rinsing,I just apply product and massage in a circular motion (you don’t need too much product to do the work).
3. I leave for like 5-10 mins (personal choice)
4. I rinse off the product with warm water
5. Then pat dry and moisturize
Observations:
Well my face feels clean and smooth. It doesn’t strip my face of any moisture whatsoever,but rather reveals a fresh smooth skin.
~~~> Pros
• It keeps to its promise stated earlier.
(I don’t know about the removing of blackheads part because I don’t have black heads) but it did exfoliate my skin real well.
• It is mild,therefore suitable for most skin types.
• It is economical and budget-friendly
You can this small size(227g) for #500-#700 depending on where you’re buying it, it’s available in most stores. However it’s about #1500-#3000 online (I wonder why things are ridiculously expensive online).
• It is not limited to the face. I use on my body,even on my lips. Yass!
~~~>Cons
• I don’t really like the packaging (it’s not sealed). But when I compare the pricing to how well the product works, I think I can cope with the packaging.
In CONCLUSION;
This product is really worth buying,I have no regrets at all. This is actually the second cup I’m using. I’m getting addicted to this scrub,because it works well,and it’s really making me reluctant to try another.

PS; I noticed that the ingredients are quite similar to that of St.Ives apricot scrub.
Disclaimer:
I am neither a skin therapist nor a cosmetologist.
I only make research,use products and evaluate based on observations on MY skin.
What is your take on exfoliation? Have you ever used this product? Do you think you’d give it a try? I’d like to know your thoughts….
Do not forget to follow the blog and be one of the first to view my posts, to do that, just scroll down and click follow button.
Thank you for stopping by.
Yours sincerely,
Lydia

Hello my dear reader,
Happy Easter to you!
Thank you for the love and support so far.
I hope you are enjoying and making the most of the long weekend.
Is it just me or is anyone else happy about not going to school/work tomorrow…:mrgreen:
We live in a generation where every girl/lady/woman wants to be on fleek. Nobody is on chill anymore…😂😂
Personally, I don’t really like fixing my nails,you’ll find out why soon. But here’s an inexpensive and time-saving way of getting your nails on fleek. Its called DIY (Do-It Yourself),yep, do it yourself gurrl. By the end of the post you’ll see reasons why you should really do it yourself.
So let’s get started,to get your nails done here are the things you’ll need;
• Acrylic nails (one pack is just 50-100)
• Nail polish
• Clear nail polish (nail hardener)
• Nail polish remover
• Nail file
• Nail buffer
• Cotton wool/cotton swabs
• Glue (Alteco)
Directions
1. Using a nail cutter or scissors,cut the acrylic nails to preferred length (I don’t like mine too long).
2. Using the nail file,shapen the nails to preferred shape. This is a visual guide to nail shapes.
.jpg")
I personally prefer the squoval shape (its beginning to look like s round though🙉)…

3. Buff your nails with the nail buffer and clean the surface with cotton swabs to make them smoother.
4. Apply the glue on the surface of your nail,not too much,but enough to hold the acrylic nails.

Now, let me tell you the reason why I don’t like fix my nails.
The first and only time I ever tried fixing my nails,I went to a around school . During the course of fixing it they put so much glue that I made that i could it see the dried up residue right beneath the acrylic nails. To make matters worse some layers my nails peeled off when it took it off. To be honest I was so furious and never tried it again since then. Besides I love my nails,they are strong and growing longer so I see almost no need.

But heyy, for the sake of those who love to fix their nails ,those who love DIYs and those who love trying new things let’s get back to business…shall we?
5. Apply a coat(or two) of your nail polish and allow to dry for about 5-10 mins.
6. Then apply clear nail polish (known as ‘nail hardener’) then leave for about 15-20 mins to dry properly.
And voila,you got ya nails done.

PS; You could also fix the acrylic nails before shaping it,if it’ll be easier for you that way. I just chose to do it this way.

The best part of fixing your nails yourself is that;
– You get to do it to your taste.
– You get to keep the remaining acrylic nails,nail polish,nail polisher remover and every other thing used, so you use them another time.
– You get to use just the right amount of glue you need, so you don’t end up like me.
– You don’t need queue up to get your nails fixed(Gosh It’s so annoying😒), when you can use that time to fix it yourself and do other things.
I’m loving the nails,yikes!

So ladies,lets get talking, I’ll love know what’s you think. What’s your opinion on getting your nails done yourself,please drop your comments.
Have a wonderful week ahead!
And Happy Easter once again…😘😘


Thank you for stopping by.
Yours sincerely,
Lydia
